Showing posts with label Bread. Show all posts

Saturday, August 4, 2012

Biscuits


One of the things I used to love about my childhood was family time. Grandmothers are often the glue that holds the family together and the Johnson family was no exception. My grandmother used to gather everyone together on Sundays and holidays so we could enjoy family time. And sadly, since her transition, those moments of family, food and fellowship rarely take place any longer.

During my childhood, I spent a lot of time at my grandmother's house. I must say that initially I would go with dread, because as a young child I always wanted to go outside to play. And there were no kids around her house, nothing to do in her neighborhood and just not many things to get in to, other than the sweets she always kept around the house. To make bad matters worse, my piano instructor lived across the street from her. And I always felt like I had to hide from her lest she make me come over and start rehearsing for my next audition. Because there was nothing for a young person to do, I ended up spending a lot of time bonding with Nana at the kitchen table, watching her tidy up around the house and learning how to find my way around the kitchen.

My grandmother was a serious baker and did most, if not all, of her baking from scratch. I used to love watching her cook and bake. Breakfast at her house would often consist of homemade cinnamon buns, biscuits, scrambled eggs, livermush, grits and/or applesauce.

So today I had a healthier version of grandma's breakfast and, I must say, my biscuits might give Nana a run for her money! She would be proud.


Buttermilk Biscuits

2 c all-purpose flour
1 tbsp baking powder
1 tsp sugar
1/2 tsp salt
1/2 c (1 stick) cold unsalted butter
3/4 cup of buttermilk


Whole Wheat Biscuits

2 c white whole wheat flour
4 tsp baking powder
1/2 packet stevia
1/2 tsp salt
1/4 c cold unsalted butter
1 c milk (I used unsweetened hemp milk)

Preheat oven to 425 degrees. Mix flour, baking powder, sugar, and salt together. Cut the stick of butter into pieces, and work into the flour mixture with your hands or a pastry blender until it resembles pea-sized crumbs. Add milk, mixing until a bit loose and sticky.

Pour dough out on a floured surface and knead for a minute. Create ball with dough and roll it out. Do not knead too much or biscuits will be tough.

Using a round cutter, cut out your biscuits and place on baking sheet. Do not twist cutter from side to side when cutting biscuits. Bake until tops are browned, about 12-15 minutes. Brush each biscuit with melted butter and serve warm.


Spending time with Nana, having Sunday and holiday dinners, catching episodes of the Edge of Night and As The World Turns at the kitchen table, watching how she cooked with love and soul...and not to mention the soft peppermint sticks and Brach's candy mix in her living room candy jar...Priceless.

All photographs are actual pictures of the recipe listed, prepared by Virtually Everything Sweet, and cannot be used without the owner’s consent.

Sunday, May 27, 2012

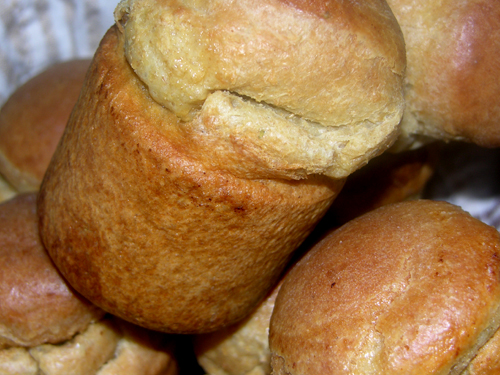
Popovers


One of the things I miss most with my new eating plan is not being able to savor the taste of hot bread with some cold butter slathered on the top. I purchased a Sunbeam bread maker some years ago and used to make my own challah, cinnamon raisin bread and whole wheat bread...and now it is sitting collecting dust. A pure tragedy.

Earlier this year, I was dining at a restaurant called BLT Steak and we were served popovers before our meal. It's difficult for me to eat dinner out because I never know what ingredients are in the food - so when it comes to stuff like that, I just pass the basket. But I later realized  you can make popovers without yeast...just flour, salt, milk and eggs.

Using alternative milk and flours does not always produce the same results when baking. But this morning I was going to find out. I prefer sweet breads so I used almond milk instead of whole milk and added some orange zest.

So what makes a popover "pop"? The high proportion of liquid in the batter creates steam that causes the popovers to puff up. In order to have perfect popovers DO NOT PEEK. Never open the oven until the popovers are finished baking. If you don't own a popover tin, you can make these in a regular muffin tin; they just won't be as tall and as pretty. When you remove popovers from the oven, unmold and place onto a rack. Pierce the sides with the tip of a sharp knife to let steam escape - this will keep the exterior crisp and prevent the popovers from collapsing.


Popovers

3 tbsp melted butter, divided
3 eggs
1 c milk, heated for 45 seconds (or substitute hemp, rice or almond milk)
1 c all-purpose flour (or substitute white whole wheat flour)
1/2 tsp kosher salt
1 packet Stevia

Preheat the oven to 450 degrees F.

Preheat muffin tin by placing it in oven for 10-15 minutes prior to baking.

In a blender or food processor, mix the eggs until pale yellow. Add the warm milk and blend. Add the remaining ingredients (with the exception of 1 tbsp butter) and blend. Brush the remaining butter on the muffin tins. Pour the batter into the warmed tins and return it to the oven.

Bake at 450 degrees for 20 minutes. Reduce the oven temperature to 350. Bake 20 minutes longer or until golden brown. Serve warm.


Cheesy Popover

If you want a heartier popover, use whole milk, and add the following:

1/4 c grated Cheddar
1/4 c grated Parmesan
2 tbsp chopped chives
1 tsp paprika


If you want to sweeten the bread, you can add a tsp of orange zest to the batter and this cinnamon sugar to the top:

Cinnamon Sugar

1/2 c sugar
1 tsp ground cinnamon
1/4 c unsalted butter, melted

Brush tops of popovers with cinnamon sugar mixture and serve warm.

All photographs are actual pictures of the recipe listed, prepared by Sweet Treats 'n Good Eats, and cannot be used without the owner’s consent.

Sunday, March 11, 2012

Cheddar Bay Biscuits


I miss eating those cheddar biscuits at Red Lobster. Every now and again if I want to cheat on my meal plan, these biscuits are more enticing to me than dessert. Unfortunately, they are not typically something you can eat just one of. So that can be a problem, particularly when you are not supposed to be eating them at all.

These biscuits are simpler than making regular homemade biscuits because drop biscuits simply require you mixing the ingredients and dropping them on a cookie sheet. No kneading, no rolling...so you too can make these popular biscuits at home.


Biscuit Making Tips:

Tip #1 - Always use very cold butter, lard or shortening. Cold ingredients will give you a flakier biscuit. You can shred the butter with a grater or just cut it in very small pieces.


Tip #2 - Mix the butter and flour just until it resembles coarse sand. You can do this with a food processor, stand mixer, pastry blender, or your hands. Be careful not to overwork the dough, if you use your hands, or you will warm the butter up.

Tip #3 - Make sure you are using very cold liquids and mix just until moistened for a lighter biscuit.


Tip #4 - Never grease the outside of the biscuit. Add butter after taking them out of the oven.

Tip #5 - Do not overbake the biscuits. Be sure to check the biscuits a few minutes early to see if they are ready to pull out.

Tip #6 - To reheat biscuits, wrap them in foil and place them in the oven (at 350 degrees) for 10 minutes, or until warm.


Cheddar Bay Biscuits

1 3/4 c all-purpose flour
3/4 c yellow cornmeal
4 tsp baking powder
1 tsp baking soda
1 tsp sea salt
1 1/2 tsp garlic powder
1/2 stick unsalted butter (cold), cubed
2 c sharp Cheddar cheese, shredded
5 scallions, finely chopped
1 1/3 c well-shaken buttermilk

Preheat oven to 450°F. Line baking sheet with parchment paper.

In a food processor, add flour, cornmeal, baking powder, baking soda, salt and garlic powder. Add the butter and pulse until mixture resembles coarse sand.

Dump contents into a large mixing bowl. Gently toss in scallions and cheese. Hand stir the buttermilk until  just combined.

Drop dough on lined baking sheet at least 2 inches apart. Bake for 12-15 minutes or until golden. Brush butter on top while warm. Serve.


Damn these were so good. I almost licked the crumbs from the plate. Seriously.

All photographs are actual pictures of the recipe listed, prepared by Sweet Treats 'n Good Eats, and cannot be used without the owner’s consent.

Monday, October 3, 2011

Buttermilk Skillet Cornbread


A few things Southerners are known for: 1) they make some ridiculously good, but diabetic coma sweet, iced tea; 2) peach cobbler and sweet potato pie are dessert staples; and 3) don't sleep on a plate of buttermilk cornbread, black eyed peas and collard greens...make you want to slap ya grandma.

I am making some skillet cornbread to go along with my bowl of chili tonight. Now if you suffer from high cholesterol, you might just want to look at the photos and skip the recipe. Because this recipe calls for butter in proportions that would win Paula Deen's approval! You need a cast iron skillet for this recipe. You can use white or yellow cornmeal. And if you really want to kick your cornbread up a notch, use a bit of bacon grease instead of butter.

If you don't own a cast iron skillet and feel compelled to run out and buy one, you can typically find them at Target (between $12-$20). You will want to season your cast iron pan before you use it. Seasoning a pan gives it a stick-resistant coating of polymerized fat and oil on the surface, which will prevent it from rusting and foods from sticking to the surface. 

How to season your cast iron skillet:
  1. Heat the oven to 300 degrees.
  2. Coat the pan with lard. Don't use a liquid vegetable oil.
  3. Place the pan in the oven. In 15 minutes, remove the pan; pour out excess grease.
  4. Place the pan back in the oven and bake for 2 hours.
Tips for caring for your cast iron skillet:

  1. Allow hot cast iron skillets to cool gradually.
  2. Never immerse a seasoned cast iron skillet in water to clean it.
  3. To rid the cast iron pan of minor rusting, use a steel wool pad and put it through another round of seasoning.
  4. Never drop cold water into a hot cast iron skillet or it will split or crack.

Buttermilk Skillet Cornbread

2 c buttermilk, at room temperature
2 eggs, at room temperature
1 stick butter, melted
2 c cornmeal
2 tsp baking powder
1 tsp baking soda
1 tsp kosher salt
1/8 c sugar (or one packet Stevia)

Preheat the oven to 425 degrees and place cast iron skillet inside to heat as you mix the batter.

Combine the buttermilk and eggs. In a medium sized bowl, combine the cornmeal, baking powder, baking soda, salt and sugar. Combine the wet and dry ingredients together. Whisk in 6 tbsp of the melted butter.

Carefully remove the hot skillet from the oven. Reduce oven temperature to 375 degrees.

Add the remaining 2 tbsp butter to the hot skillet, coating the sides and the bottom. Pour the batter into the skillet and place it in the center of the oven. Bake until toothpick inserted into the center comes out clean, approximately 20-25 minutes. Remove skillet to wire rack and let cornbread cool for 10-15 minutes. Invert onto wire rack. Cut cornbread into wedges and serve.

All photographs are actual pictures of the recipe listed, prepared by Sweet Treats 'n Good Eats, and cannot be used without the owner’s consent.

Sunday, December 19, 2010

Banana Nut Bread


I have never liked the taste or texture of bananas, eaten as a plain fruit. But oddly enough, I rather enjoy them in banana nut bread. If I can get nostalgic for a minute and take you back to my childhood, I really love banana Kits and Now-and-Laters. Remember those? I actually used to call them Nowlaters…when did they put that ‘and’ in there? Lol.

There was a candy lady in our neighborhood that sold every candy imaginable, right out of her living room, and we could buy those for just pennies, along with Boston Baked Beans, Cherry Chans, Alexander the Grape, Pop Rocks, Fun Dip, Jolly Ranchers, Atomic Balls, Laffy Taffy, BB Bats, Sugar Daddys, Sugar Babies…need I say more? Ah, those were the days.

I have gotten feedback from a few of my non-cooking friends about the desserts being too hard to duplicate and needing some easier recipes. Now I will buy that for the cheesecakes and more complex desserts. But seriously, the bread recipes, that don't include yeast, only require you to be able to measure and mix. So no more excuses! This recipe can be prepared in just minutes and you can be eating bread in less than an hour and a half. And this doesn’t require all of the fancy equipment, like the stand mixers; it can be mixed with a hand mixer…and some bread recipes with a wooden spoon. So, let’s get this party started.

Banana Nut Bread

1 1/2 cups whole-wheat flour
1 teaspoon baking soda
1/2 teaspoon salt
1 stick unsalted butter, room temperature
3/4 cup sugar
2 large bananas, mashed, very ripe
2 eggs
1 tsp vanilla
1/2 cup chopped walnuts, optional

Preheat oven to 350 degrees. Grease and flour a standard loaf pan or line with parchment paper.

Stir together the flour, baking soda and salt. Set aside. In a large bowl beat the butter and sugar until blended. Beat in the banana, then the eggs until completely blended. Incorporate the flour mixture into the egg mixture in three additions, being careful to not overmix. Fold in the walnuts until blended.

Spread the mixture into the loaf pan and bake for 60 minutes, or until a toothpick inserted in the center of the loaf comes out clean. Cool in the pan for about 15 minutes, then turn onto a wire rack to cool completely.


All photographs are actual pictures of the recipe listed, prepared by Virtually Everything Sweet, and cannot be used without the owner’s consent.

Sunday, December 5, 2010

It’s Beginning to Look a Lot Like Christmas


One of the reasons I love Charlotte so much is because the weather here is almost perfect. Typically during this time of year it is still fairly mild out, around 50 or 60 degrees. But this particular afternoon we are getting a mix of sleet and rain. Are you serious? Usually, I am not opposed to sleet and snow when I have nothing else to do on a Saturday afternoon. But I am not ready for snow quite yet. Glad I got my milk and eggs earlier this week! I am positive that many Charlotteans are flocking to the store to raid the shelves as I type.

Since today is a good day for movies, blankets, hot cocoa or tea, I am thinking something warm and apple may be what’s needed to add some sunshine to this otherwise gloomy day. Apple pie, apple crisp, stewed apples? I think applesauce bread is going to be on today’s menu. That way I can quickly get back under the blanket and see what scandal is brewing on Lifetime Movie Network.

Applesauce Bread

1 1/2 cups whole wheat flour
1/2 tsp baking powder
1/2 tsp baking soda
1/4 tsp sea salt
1 tsp cinnamon
1/2 tsp nutmeg
3/4 cup applesauce
2 eggs
1/2 cup honey
1/4 cup melted butter

Preheat oven to 350 degrees. Line an 8x8 loaf pan with parchment paper.

Combine dry ingredients in a large mixing bowl. Fold in add applesauce, eggs, butter and honey. Pour into prepared loaf pan. Bake for 50 minutes at 350 degrees, or until a toothpick inserted in the middle of the loaf comes out clean.

Delicious with a cup of Twinings Herbal Unwind Egyptian chamomile and apple tea.


All photographs are actual pictures of the recipe listed, baked by Virtually Everything Sweet, and cannot be used without the owner’s consent.
Friday, December 3, 2010

Grand Marnier French Toast


I’m not a real big breakfast person. But every now and again I will fix my famous spinach and egg casserole, Southern grits and Grand Marnier French Toast. Everybody raves about this recipe but it is very heavy. So with people trying to stay fit and trim, I have had to table this dish for a while. I feel inclined to warn you that I have had guests to fall asleep at the table after consuming this French toast so proceed with caution.

So today my bestie is here visiting from New York so I thought, what better way to keep her here for a few extra days than to spoil her or render her useless with this French toast? Unfortunately, she hasn’t fallen asleep yet so I guess my plan isn’t working.

Most people are accustomed to preparing their French toast on a griddle or by frying it on the stovetop. But you will bake this French toast in the oven. The bread can be baked as soon as the milk mixture is absorbed or, better still, after letting it rest overnight.

If you don’t have any Grand Marnier on hand, you can substitute Cointreau.

Grand Marnier French Toast

2 large eggs
1 ½ c half and half or heavy cream
¼ c Grand Marnier
¼ c orange juice
2 tsp sugar
1 tbsp grated orange zest
½ tsp vanilla extract
2 tbsp cinnamon
1 tsp nutmeg
8 challah bread slices
4 tbsp butter, melted

Whisk the eggs, milk, flavoring and seasonings in a bowl. Dip challah into egg mixture and arrange in glass baking dish. Let stand until egg mixture has been absorbed. May be done overnight.

Preheat oven to 375 degrees. Brush cookie sheet with butter. Place French toast on cookie sheet and bake for 45 minutes. Turn French toast halfway through.

Garnish with powdered sugar and serve.


All photographs are actual pictures of the recipe listed, baked by Virtually Everything Sweet, and cannot be used without the owner’s consent.

Wednesday, December 1, 2010

What's for Breakfast?


If you ask me, sleep is way more important than getting up early in the morning to make breakfast, particularly when you don't go to bed before 3am. So oftentimes, I need some grab 'n go items so I can catch up on my much needed beauty rest.

One of my favorite muffins is the classic bran muffin. When I am not having it for breakfast, I sometimes eat it along with my grilled chicken breast salad at dinnertime. I'm not counting calories but we all need to work on making less trips to the fast food drive-thru and these don't necessarily taste healthy. They're really good! You get what I mean, right? They are also a great source of fiber.

For the cereal portion in this particular recipe, I will typically buy the store brand stuff...but let's just keep that between us. And as per the usual, I snuck a little alcohol in here too. Yes I know, even for breakfast.


Bran Muffins

1 1/2 cups bran cereal (plain)
1 c buttermilk
1/3 c vegetable oil
1 egg
2/3 c brown sugar
1 tsp vanilla extract
1/2 tsp brandy
1 c AP flour
1 tsp baking powder
1 tsp baking soda
1/2 tsp salt
1/2 c raisins

Preheat oven to 350 degrees. Grease muffin tin or line with parchment paper.

Sift flour, soda, baking powder and salt and set aside.

Combine bran cereal and buttermilk in a bowl and let stand until buttermilk is absorbed. Beat oil, egg, sugar, and flavoring and add to the bran mixture. Stir flour mixture into buttermilk mixture. Fold in raisins. Spoon batter into prepared tins. Bake for 15-18 minutes or until a toothpick inserted in the center of the muffin comes out clean.

Now don't eat too many of these on the way to work or you might have a slight problem! Otherwise, enjoy!


All photographs are actual pictures of the recipe listed, baked by Virtually Everything Sweet, and cannot be used without the owner’s consent.

Monday, November 29, 2010

It's The Great Pumpkin


It's The Great Pumpkin! I couldn't resist making that the title of this blog because my son and I absolutely love watching Charlie Brown. He and I both are too old to be watching cartoons but that's another post altogether.

Many of us are accustomed to having something with pumpkin during the Thanksgiving holiday. It’s just that time of year. Pumpkin pie, pumpkin bread, pumpkin muffins, pumpkin cheesecake…

So who am I to break tradition? I decided on some pumpkin bread to grab during the week for a quick, simple breakfast treat. This recipe can be made in just minutes and is great paired with a cup of Tazo’s Organic Chai...the perfect start to your day.

Pumpkin Bread

1 ½ c sugar
1 2/3 c flour
¼ tsp baking powder
1 tsp baking soda
¾ tsp salt
½ tsp ground cloves
½ tsp nutmeg
1 tsp cinnamon
½ c vegetable oil
½ c water
1 tsp vanilla
½ tsp bourbon
1 c mashed pumpkin (I prefer Libby’s)
2 eggs
½ c nuts, optional
¼ c raisins, optional

Sift all dry ingredients together in a mixing bowl. Gently stir in remaining ingredients. If using nuts and/or raisins, incorporate them last by gently folding them into the batter.

Pour batter into 4x8 buttered and floured loaf pan or line loaf pan with parchment paper. This recipe usually makes enough for two loaf pans (or one loaf pan and a muffin pan). Bake at 350 for an hour or until toothpick comes out clean.


All photographs are actual pictures of the recipe listed, baked by Virtually Everything Sweet, and cannot be used without the owner’s consent.

Saturday, November 27, 2010

Bread Pudding


Fall is officially here and with fall comes a desire for warm, hearty comfort foods. Typically when I think of fall I think of sweet potato and pecan pie, pumpkin and banana nut bread, apple crisps and peach cobbler…but today my thoughts were centered around bread pudding. I had never tried bread pudding before so I was a little unsure of how this would taste. Would the bread be too soggy? Would it taste any different than French toast? What is so exciting about bread pudding? Well…now I know.

I didn’t have time to make my own challah for the bread pudding this time around because I am a right now kind of gal - and did not want to wait a day or two for the challah to get stale. So, off to Trader Joe’s I go to get some Tuscan Pane artisan bread. The entire recipe may seem a little complex because I am a little “extra” or at least that’s what they tell me. But the basic recipe is really quite simple.

Bread Pudding

1 loaf French bread, at least a day old, cut into 1-inch squares (about 6 cups)
1 qt milk
3 eggs, lightly beaten
2 cups sugar
2 Tbsp vanilla
1 Tbsp orange juice
1 cup raisins (soaked in 1/4 cup bourbon)
1/4 teaspoon nutmeg
1/2 teaspoon cinnamon

Preheat oven to 350°F. Soak the bread in the milk in a large dish or mixing bowl until all of the milk is absorbed. In a separate bowl, beat eggs, sugar, vanilla, and spices. Gently stir into the bread mixture. Incorporate the raisins into the mixture gently. Spray a 9x13 inch baking pan with baking spray. Pour in the bread mixture and bake at 350°F for 35-45 minutes, or until set. The pudding is done when the edges start getting a bit brown and pull away from the edge of the pan. You can also make in individual ramekins, which is my personal favorite in terms of presentation. Note: Bread pudding tastes best when eaten the day it is made.

Alcohol makes everything taste better! So my bread pudding would not be complete without a warm bourbon or caramel sauce.


Bourbon Sauce

1/4 cup (1/2 stick) unsalted butter
1/2 cup sugar
3 tablespoons whipping cream
2 tablespoons bourbon
Pinch of salt

Melt butter in small saucepan over medium heat. Whisk in remaining ingredients. Simmer until thickened, whisking often, about 3 minutes. Cool slightly.


Caramel Sauce
4 tablespoons unsalted butter, softened
2 tablespoons granulated sugar
2 tablespoons light brown sugar
1/3 cup dark brown sugar
1/2 cup heavy cream
1/4 teaspoon pure vanilla extract
1/4 teaspoon salt

In a medium saucepan, combine the butter with all three sugars and bring to a boil, stirring constantly. Cook over moderately high heat for 2 minutes, stirring constantly. Add the cream and boil for 2 minutes longer. Stir in the vanilla and salt and serve.

AND…I did mention I was a little “extra”, didn’t I? I had to go and add some homemade vanilla bean ice-cream. Viola! Dessert was served.


Vanilla Icecream (Cuisinart recipe)

1-1/2 cups whole milk
1-1/8 cups granulated sugar
3 cups heavy cream
1-1/2 tablespoons pure vanilla extract

In a medium mixing bowl, use a hand mixer on low speed to combine the milk and granulated sugar until the sugar is dissolved, about 1 to 2 minutes. Stir in the heavy cream and vanilla. Turn the machine on; pour the mixture into freezer bowl, and let mix until thickened, about 20 to 25 minutes. The ice cream will have a soft, creamy texture. If a firmer consistency is desired, transfer the ice cream to an airtight container and place in freezer for about 2 hours. Remove from freezer about 15 minutes before serving.

Now, needless to say, I will have to add in a few extra crunches and an additional day of cardio. But hey, what’s life without a few sweet treats? Enjoy! I know I did. 


All photographs are actual pictures of the recipe listed, baked by Virtually Everything Sweet, and cannot be used without the owner’s consent.