Monday, April 9, 2012
Homemade Whole Wheat Tortillas
I am stuck with a few leftovers from yesterday's dinner and wanted something different. So I am using my pot roast in some tortillas for lunch.
I discovered a cheese alternative a few months ago that I was very pleased with. But since that time, I have stumbled on one that I enjoy even more and that melts better on pizzas and quesadillas. It is called Vegan Gourmet Mozzarella. Most dairy alternatives do not last as long as your typical dairy products so you need to use this cheese fairly quickly - or shred and freeze it. This cheese is vegan and gluten free and has no casein, which is the protein in cow's milk that causes those globs of mucus to get stuck in the back of your throat...well in mine anyway.
These tortillas can be made with corn, all purpose, whole grain or white whole grain flour. I did not have time to go through the process of making an actual quesadilla so I just took the roast, added some peppers, onions, cheese and arugula, rolled it up and drizzled it with some balsamic vinegar.
Whole Wheat Tortillas
1 1/2 c white whole-wheat flour (or whole wheat flour)
1 tsp salt
4 tbsp unsalted butter, frozen
3/4 c very warm water (or milk)
Cut butter into small cubes. Set aside momentarily. Mix flour and salt in food processor. Add butter and pulse a few times, until crumbly. Add liquid and pulse until dough forms into a ball.
Remove dough and place onto a lightly floured surface and lightly knead. Add a little more flour if needed. Dough should be soft.
Divide dough into 8 portions. Flatten dough into disks and sprinkle with flour. Cover with a kitchen towel and let rest for approximately 10 minutes. On a floured surface, roll disks into circles.
Preheat griddle (or large skillet) over medium-high heat for five minutes. Place tortillas on warm griddle. Cook 1-2 minutes, until puffed and brown. Cover with towel to keep warm.
Pot Roast Quesadillas
Leftover pot roast
Mozzarella cheese
1 tbsp olive oil
Red peppers
Red onion
Arugula
Salt and pepper, to taste
Balsamic Vinegar, optional
In a small saucepan, heat olive oil and saute red onions and peppers for approximately 3-5 minutes. Set aside.
Place a pat of butter in a saucepan. Place tortilla into the pan, sprinkle some cheese on the tortilla followed by the beef, onions, and peppers; top with more cheese, arugula and finally the other tortilla. Cook until the quesadilla is golden brown on both sides and the cheese is melted. Sprinkle with balsamic vinegar.
All photographs are actual pictures of the recipe listed, prepared by Sweet Treats 'n Good Eats, and cannot be used without the owner’s consent.
Labels:
Dairy Free,
Tortillas,
Whole Wheat
Sunday, April 8, 2012
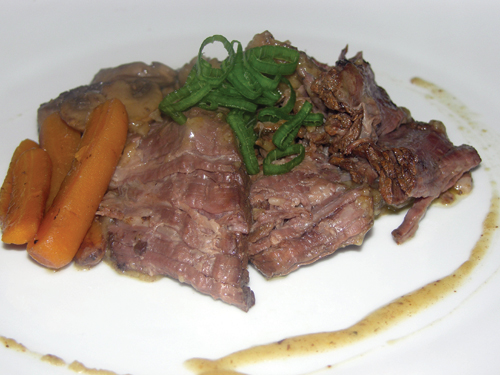
Crockpot Pot Roast
One would never imagine that something so good was so simple. But this crock pot recipe is just that.
One thing I did not intend to do for this Easter holiday is be slaving in the kitchen from sun up to dinner time. So I am going to use the crock pot to make my roast so I can actually enjoy the day with everyone else.
The best cuts of meat for a crock pot are the ones which are toughest when cooked with dry methods. So select a chuck or round roast if you are planning to cook it in the crock pot. If you cook it slow, all of the collagen from the roast melts and turns into gelatin, which makes for a tender, yummy end result.
Tips:
- Be sure to let the roast rest for at least ten minutes before carving to allow the natural juices to settle.
- Use a knife that has been sharpened before you begin carving.
- Carve the roast across the grain at a consistent angle for each slice. This will result in a more tender cut.
1 3-4lb chuck roast, boneless
Salt and pepper, to taste
Garlic powder
2 tbsp extra virgin olive oil
1 large onion, sliced
1 c baby carrots
3 celery ribs
Mushrooms, optional
3 garlic cloves, chopped
Thyme springs
1 bay leaf
1/4 c flour
1/2 c red wine, beer or bourbon
1 1/2 c beef broth
Heat the olive oil in a skillet until hot. Rub salt, pepper and garlic powder into the roast. Brown the meat on all sides.
Season the vegetables and place them in the bottom of the crock pot.
Put the meat on top of the vegetables.
With the oil from the browning, place the flour in the pan and whisk until incorporated and slightly browned, stirring constantly. Be sure to get all of the bits from the bottom of the pan. Add the liquids to the pan, whisk and reduce.
Pour the liquid over the roast, into the crock pot. Top with thyme sprigs and bay leaf. Cover and cook until tender, 8 hours, in a slow cooker (or in a 350 degree oven for 2.5-3 hours).
All photographs are actual pictures of the recipe listed, prepared by Sweet Treats 'n Good Eats, and cannot be used without the owner’s consent.
Saturday, April 7, 2012
Mixed Greens
It is Easter weekend and it is smelling like ya grandma's place over here. At my house it is mandatory that every holiday dinner be accompanied by greens of some sort. I love collards, kale and turnip greens so I am preparing some mixed greens with our Easter dinner.
As much as I love greens, my back and my neck don't like the cleaning process. So sometimes I will cheat and purchase the pre-cut greens. And even though they still need washing, it is not as tedious as cleaning, rolling, cutting and removing the stems from buying the bundles of greens. Whew! I am getting tired just thinking about it.
Mixed Greens
24 oz water
2 smoked turkey parts (or ham hocks)
2 lbs fresh greens
1 small onion, diced
2 to 4 tbsp extra virgin olive oil
1/2 tsp paprika
1/4 tsp cayenne pepper
1 tsp crushed red pepper
Salt and pepper, to taste
1/2 tbsp sugar
1/4 c organic apple cider vinegar
16 oz chicken stock
Add water to a large stockpot and bring to a boil. Add smoked turkey parts or ham hock and boil for approximately 30 minutes, to season the water, as you clean the greens and remove the stems.
In a small saucepan, saute onions for about 5 minutes over medium heat.
Add greens to seasoned water, in handfuls, until pot is full. Cover and cook collards down for about 45 minutes. Add onions, olive oil, seasonings, chicken stock and apple cider vinegar. Cover and continue to cook greens for another hour to an hour and a half.
About mid-way through cooking the greens, taste the greens and adjust the seasonings, if necessary.
All photographs are actual pictures of the recipe listed, prepared by Sweet Treats 'n Good Eats, and cannot be used without the owner’s consent.
Labels:
Collard Greens,
Greens,
Turnip Greens,
Vegetable
Peach Cobbler
When I was eating sweets peach cobbler was, hands down, one of my favorite desserts.
I am going to be posting a few items over the weekend that are on my Easter dinner menu...and some of these are totally not on my meal plan; but I am staying true to my sugar free diet. Sadly this peach cobbler will not be on my plate. But, my son and sister are here so I won't bore them with all of my sugar-free treats.
I fondly remember the good ole days when Easter consisted of large family dinners, good food, sunrise service and new Easter suits. And then there was Easter Monday. We would get together with our friends and spend the entire day at Paramount Carowinds theme park. Candy apples, funnel cakes, jelly bellies, turkey legs, Thunder Road, White Lightning, the Cyclone, the water park...those were some good times. But back to reality...and this cobbler.
Peach Cobbler
Crust:
2 c all-purpose flour
A scant tsp salt
1 1/2 sticks frozen unsalted butter, cut into small pieces
1/4 c ice cold water
Combine the flour, salt and butter in a food processor. Pulse until the mixture is the texture of cornmeal. Add ice water and pulse until mixture forms a ball.
Dust the dough lightly with flour and shape into a square. Wrap in wax paper and let rest in the fridge for 30 minutes or longer.
Filling:
4 c fresh peaches, peeled, pitted and sliced
1 1/2 c water
1 tsp vanilla
1/2 tsp brandy
1 1/2 c granulated sugar
1/2 c margarine
1 tbsp cinnamon
Pinch of salt
1/2 tsp nutmeg
In a medium pot, cook ingredients until tender, but not mushy.
Spray a glass baking dish with cooking spray. Add peaches to baking dish. Dot with butter. Place pastry crust over the peaches and cut 4 slits in the top. Brush crust with egg wash.
Bake at 375 degrees for 45 minutes or until browned and bubbly.
All photographs are actual pictures of the recipe listed, prepared by Sweet Treats 'n Good Eats, and cannot be used without the owner’s consent.
Tuesday, March 20, 2012
Roasted Brussel Sprouts
Although we did not have them often, brussel sprouts were one of those vegetables that I absolutely hated to eat when I was a kid. Brussel sprouts, turnips, okra and beets. Ugh! But brussel sprouts are making a comeback! I don't know what was such a turn off back then because they honestly taste like cabbage with a hint of bitterness. And I have always been a fan of cabbage.
Brussel sprouts have many health benefits. They contain flavonoid anti-oxidants which, together, offer protection from prostate, colon, prostate and endometrial cancers. Brussel sprouts are an excellent source of vitamin C, A and E. They are also rich source of minerals like copper, calcium, potassium, iron, manganese and phosphorus.
Because the sprouts vary in size, if you are roasting them, keep an eye out to prevent them from burning.
Brussel Sprouts
1 c balsamic vinegar
1/2 pound prosciutto, chopped
1 pound brussel sprouts
3 tbsp extra virgin olive oil
Kosher salt and ground pepper, to taste
Clean brussel sprouts and remove any loose leaves. Trim bottoms from brussel sprouts and cut in half.
Heat balsamic vinegar in a saucepan over high heat and bring to a boil. Reduce heat to medium-low. Simmer for 15 minutes. Set aside.
Adjust oven rack to middle position and preheat oven to 425°F. Place lined baking sheet in oven.
Chop prosciutto into small pieces. Toss sprouts, olive oil, and salt and pepper in a large bowl. Once baking sheet has gotten warm, remove it from oven and arrange brussel sprouts in a single layer. Note: Do not sprinkle prosciutto over the brussel sprouts until about ten minutes into roasting or it will burn. Roast brussel sprouts for approximately 20 minutes or until tender.
Remove from oven and sprinkle with balsamic glaze.
All photographs are actual pictures of the recipe listed, prepared by Sweet Treats 'n Good Eats, and cannot be used without the owner’s consent.
Labels:
Balsamic Vinegar,
Brussel Sprouts,
Vegetable
Monday, March 19, 2012
Arugula Pesto Pizza
It's March Madness and the North Carolina Tar Heels were playing yesterday so I wanted some basketball watching food as opposed to the typical Sunday dinner. So I made a pizza.
Homemade pizza was a staple in my house on Friday evenings when my son was at home. But with my lifestyle/diet change and with my son being away at college, pizza has become a thing of the past.
What I love about making pizza is that you can use a myriad of toppings - chicken breast, pepperoni, prosciutto, ground beef, Italian sausage, goat cheese, mozzarella cheese, Parmesan cheese, pineapple, spinach, onions, mushrooms, peppers, shrimp, artichokes...whatever your little heart desires. And when I have too many choices, I will do a half and half and have two pizzas in one. In addition to the various toppings, you can use pesto, tomato or hummus as a base.
The only real noticeable difference in my pizza and the pizza I used to eat is the lack of gooey cheese. Nevertheless, the pizza turned out great and Carolina beat Creighton (87-73)...so it was a good day.
Pizza Making Tips:
- You will only require a small amount of sauce to make your pizza; never cover your pizza dough clear to the edge.
- If you use cooked vegetables on your pizza, make sure to cool them or you will have pizza "soup".
- Use very high heat, 450-500 degrees, and use the lower third of the oven to bake your pizza.
- If you are able to purchase one, get a pizza stone for your homemade pizza baking. Pizza stones make an excellent, crispy pizza crust - but you can make a great pizza without it.
- To assemble your pizza, follow this order: oil, cheese, toppings, cheese, oil, garnish or oil, meat, veggies, cheese.
Kale and Arugula Pesto
1/2 c diced walnuts (OR pine nuts, almonds, cashews, hazelnuts)
1 garlic clove, smashed
1 c kale
1 garlic clove, smashed
1 c kale
1 c arugula
1/4 c Parmesan cheese, grated (optional)
1/4 - 1/2 c extra virgin olive oil
Dash of lemon juice
1/4 c Parmesan cheese, grated (optional)
1/4 - 1/2 c extra virgin olive oil
Dash of lemon juice
Salt and freshly ground pepper, to taste
Add nuts to a small saucepan and toast on the stove top for approximately 2 minutes, tossing constantly. Remove from heat and cool.
Pulse garlic clove in food processor for about 30 seconds. Add kale, arugula toasted nuts and cheese and pulse. Add olive oil into the food processor in a steady stream until you get the consistency you desire. Season to taste with salt and pepper. Stir in lemon juice.
Arugula Pesto Pizza
1 oz goat cheese, coarsely crumbled (or 8 oz mozzarella and 1/2 c Parmesan cheese)
1 package prosciutto
1 package pepperoni
1 lb mushrooms, thinly sliced
2 Roma tomatoes, thinly sliced
1 small red onion, chopped
1 small green pepper, chopped
10-12 black olives
Pesto or tomato sauce (as base)
Yeast Free Pizza Dough
2 tsp baking power
2 c unbleached flour (or white whole wheat flour)
1 1/2 tsp salt
1/4 c olive oil
2/3 c water
Fresh rosemary, chopped
Combine all ingredients in mixing bowl. Knead on floured counter top for about 3-4 minutes. Cover with saran wrap until ready to roll and use.
Regular Pizza Dough (with yeast)
1/2 c warm water (110 degrees)
1 packet instant yeast
1 1/4 c water, room temp
2 tbsp extra virgin olive oil
4 c bread flour
1 1/2 tsp salt
cornmeal
Measure the warm water (110 degrees) into a liquid measuring cup. Sprinkle yeast over water and let stand until the yeast dissolves and swells, approximately 5 minutes. Add the 1 1/4 c water and oil. Stir to combine.
Place the flour and salt in the bowl of a stand mixer fitted with the paddle attachment. Combine the dry ingredients at a low speed. Slowly add the liquid ingredients and continue to mix at low speed until dough forms. Replace the paddle with the dough hook. Knead until the dough is smooth and elastic, about 5 minutes. Form the dough into a ball, put it in a deep oiled bowl, and cover with plastic wrap. Let rise until doubled in size, about 2 hours. Punch the dough down.
Turn dough out onto a lightly floured work surface. Divide the dough into two equal parts. Form both pieces of dough into round balls and cover with a damp cloth. Let dough relax for 10 minutes. Shape the dough and transfer to a pizza peel.
Making the Pizza
Preheat oven to 450 degrees.
Dust the pizza stone or pizza pan with cornmeal. Shape dough and place on pizza stone. Brush some olive oil on crust. Layer sauce (or pesto) on the pizza dough, then the meat of your choice, veggies, and the cheese on top.
Bake until crisp, in lower part of oven, about 10-15 minutes.
All photographs are actual pictures of the recipe listed, prepared by Sweet Treats 'n Good Eats, and cannot be used without the owner’s consent.
Labels:
Arugula,
Dough,
Goat Cheese,
Pesto,
Pizza,
Yeast Free
Thursday, March 15, 2012
Apple Galette
I am not sure why I decided to make this apple galette today, with it being so hot outside, as it is way too warm to have the oven on today; and not quite time to switch the air on. I am one of those people who really needs to have a few weeks of relief between seasons so I am not going straight from heat to air overnight.
We have seemingly skipped right past spring and are expecting temperatures in the 80s and high 70s for the next week or two. Just a few weeks ago, my girlfriend's home was hit by a tornado that struck a small part of Charlotte and Concord, North Carolina. So while we are enjoying having the toes out and the promise of warm days, cool drinks, maxi dresses and jazz on the lake...this early warm weather also brings about more volatile weather patterns, which I am a little nervous about. But for today, there is none of that looming...just birds chirping, blue skies and a gorgeous, sunny day.
Apple Galette
The Crust:
¾ c all purpose flour (or white whole wheat flour)
1/2 tbsp sugar (or 1 packet Stevia)
Dash of salt
1/4 c cold butter, diced
5-6 tbsp ice water
The Filling:
¼ c water
Dash of lemon juice
1 large apple
2 tsp brown sugar (or 2 packets of Stevia)
½ tsp cinnamon
Dash of brandy, optional
Egg Wash:
1 egg yolk
1 tsp milk
1 tbsp coarse sugar (Ex: Stevia in the Raw or Turbinado sugar)
Combine flour, sugar and salt in a bowl. Cut in the cold butter with a pastry cutter (or use a food processor). When the dough resembles coarse sand, add the ice water. Mix well, until you can shape the dough into a ball. Cover with saran wrap and let dough rest in the fridge for an hour.
Mix water, lemon juice, brandy, cinnamon, and sugar together. Cut apple into wedges. Soak the wedges in the cinnamon sugar liquid. Set aside.
Mix the egg yolk and milk together to make the glaze. Set aside.
Preheat oven to 350 degrees. Line a baking sheet with parchment paper.
Take refrigerated dough and roll into a circle. Arrange apples in center of the dough, leaving the edges free. Dot with a little butter. Fold dough towards the center, bringing it up on all sides. Brush the crust with the egg wash and dust coarse sugar over the galette.
Bake in oven for approximately 30-45 minutes or until golden. Serve warm.
All photographs are actual pictures of the recipe listed, prepared by Sweet Treats 'n Good Eats, and cannot be used without the owner’s consent.
Sunday, March 11, 2012
Cheddar Bay Biscuits
I miss eating those cheddar biscuits at Red Lobster. Every now and again if I want to cheat on my meal plan, these biscuits are more enticing to me than dessert. Unfortunately, they are not typically something you can eat just one of. So that can be a problem, particularly when you are not supposed to be eating them at all.
These biscuits are simpler than making regular homemade biscuits because drop biscuits simply require you mixing the ingredients and dropping them on a cookie sheet. No kneading, no rolling...so you too can make these popular biscuits at home.
Tip #1 - Always use very cold butter, lard or shortening. Cold ingredients will give you a flakier biscuit. You can shred the butter with a grater or just cut it in very small pieces.
Tip #2 - Mix the butter and flour just until it resembles coarse sand. You can do this with a food processor, stand mixer, pastry blender, or your hands. Be careful not to overwork the dough, if you use your hands, or you will warm the butter up.
Tip #3 - Make sure you are using very cold liquids and mix just until moistened for a lighter biscuit.
Tip #4 - Never grease the outside of the biscuit. Add butter after taking them out of the oven.
Tip #5 - Do not overbake the biscuits. Be sure to check the biscuits a few minutes early to see if they are ready to pull out.
Tip #6 - To reheat biscuits, wrap them in foil and place them in the oven (at 350 degrees) for 10 minutes, or until warm.
1 3/4 c all-purpose flour
3/4 c yellow cornmeal
4 tsp baking powder
1 tsp baking soda
1 tsp sea salt
1 1/2 tsp garlic powder
1/2 stick unsalted butter (cold), cubed
2 c sharp Cheddar cheese, shredded
5 scallions, finely chopped
1 1/3 c well-shaken buttermilk
Preheat oven to 450°F. Line baking sheet with parchment paper.
In a food processor, add flour, cornmeal, baking powder, baking soda, salt and garlic powder. Add the butter and pulse until mixture resembles coarse sand.
Dump contents into a large mixing bowl. Gently toss in scallions and cheese. Hand stir the buttermilk until just combined.
Drop dough on lined baking sheet at least 2 inches apart. Bake for 12-15 minutes or until golden. Brush butter on top while warm. Serve.
Damn these were so good. I almost licked the crumbs from the plate. Seriously.
All photographs are actual pictures of the recipe listed, prepared by Sweet Treats 'n Good Eats, and cannot be used without the owner’s consent.
Labels:
Biscuits,
Bread,
Buttermilk,
Buttermilk Biscuits,
Cheddar Cheese
Tuesday, March 6, 2012
Chicken Pot Pie
I love a good chicken pot pie. But as I have gotten older, I no longer care for the typical chicken pot pie filling so much - peas, carrots, white potatoes...and remember those icky pearl onions? I prefer to make my chicken pot pie with squash, broccolini, zucchini, kale, fresh roasted corn, mushrooms, asparagus...getting excited just thinking about lunch time approaching.
The thought of making homemade pastry can turn some away from trying a recipe -but this crust does not require a food processor and can be done in minutes. If you decide not to make a pie crust, you can use a biscuit topping, store bought puff pastry or store bought pie crust.
I like to take Sunday's leftover whole chicken pieces to include in my filling- you can also parboil boneless skinless chicken breasts or stop by your grocery's deli and pick up a roasted chicken to pull apart and use in the filling. You can opt to make a large pie or individual pies in ramekins. Nice to have so many options!
Whole Grain Pie Crust
1 1/3 c whole grain pastry flour
1/3 c olive oil
1/2 tsp salt
1 packet Stevia (or 1 tsp honey)
2 tbsp ice cold water
Mix flour, olive oil, salt and stevia together until everything is moistened. Add water and form dough into a ball. Roll dough. If you are using crust on the bottom of your pie, place dough in a 9' pie plate and cook in the oven for 10-12 minutes until golden brown. Cool.
Chicken Pot Pie
3 tbsp unsalted butter
1 medium diced onion
2 large carrots, diced
2 celery stalks, sliced
1 c fresh corn
1 lb button mushrooms
1 lg squash
1 c brocolini, chopped
3 tbsp whole wheat flour
1 ½ c chicken stock
½ c soy milk
2 c rotisserie chicken, torn into pieces
1 tsp fresh thyme
Salt and pepper, to taste
Preheat oven to 400°F.
Melt butter in a large pot. Add the onion, carrots, celery, corn and mushrooms and cook over medium heat for 8-10 minutes. Add broccolini and squash and cook for approximately 2-4 more minutes. Toss flour over vegetable mixture and stir. Cook for a few minutes longer. Add the chicken stock and milk and bring to simmer. Stir until thickened.
Add the chicken pieces, thyme and season with salt and pepper. Cook for 5-7 minutes.
Fill pie crust with filling. Place second pie crust on top, sealing the edges. Brush with egg wash, if you choose. Cut slits in the top of the pie and bake for 30–40 minutes until golden brown and bubbly.
All photographs are actual pictures of the recipe listed, prepared by Sweet Treats 'n Good Eats, and cannot be used without the owner’s consent.
Labels:
Chicken,
Pot Pie,
Whole Grain
Thursday, February 23, 2012
Red Velvet Waffle
I keep hearing about this place in South Charlotte called Terrace Cafe and people are raving about their red velvet waffles. Somehow the thought of having a red velvet waffle did not interest me much - but considering I used to eat red velvet cake in the mornings, I guess it is not so hard to imagine. Cream cheese butter or icing, syrup and a red velvet waffle seems like enough sugar for a diabetic coma. But I am going to try a sugar-free version and see what the talk is about. Instead of cream cheese icing I will drizzle a little Greek yogurt with stevia over my waffle. This can be eaten for breakfast but would definitely make a nice dessert.
I hadn't used my waffle iron in quite a while and could not remember if it had an indicator to let me know when the waffle was ready. So if that be the case with your waffle iron, the general rule is to take the waffle out after the iron has stopped steaming.
Tips for using your waffle iron:
- Before you begin cooking, coat the grid plates with nonstick cooking spray or wipe with a paper towel lightly coated with oil.
- Once the waffle iron is hot, ladle the batter onto the waffle iron. Be careful not fill the entire grid plate with batter or the batter will overflow and cleanup will be a chore.
- For easy cleanup, unplug the waffle iron while it is still warm. Slightly dampen 2-3 paper towels, place them on the grill plate, and close the iron. Once the steam has stopped, open the iron and remove the paper towels. Do not immerse the waffle iron in water.
Red Velvet Waffle
2 c all purpose flour
1 1/4 c sugar
1/4 tsp salt
1 tsp baking soda
5 tbsp unsweetened cocoa
1/4 c unsalted butter, melted
2 c buttermilk
2 lg eggs
2 tsp vanilla extract
2 tbsp red food coloring
Preheat waffle iron and spray with non stick cooking spray.
Combine flour, sugar, salt, baking soda, and cocoa in a medium sized bowl. In separate bowl mix the butter, buttermilk, eggs, vanilla extract and red food coloring. Combine the wet and dry ingredients until moistened. Ladle batter onto the waffle iron and cook until waffle iron stops steaming.
All photographs are actual pictures of the recipe listed, prepared by Sweet Treats 'n Good Eats, and cannot be used without the owner’s consent.
Labels:
Breakfast,
Red Velvet,
Waffles
Subscribe to:
Posts (Atom)


